Google Authentication is a powerful way for users to sign in to your application using their Google accounts. Using Google Authentication, you can ensure that only authorized users can access your application, making it secure and user-friendly.
This tutorial will walk you through integrating Google Authentication into your React application.
Prerequisites:
Before beginning, ensure you have the following prerequisites:
- Basic understanding of React (no worries, we’ll keep it simple)
- NodeJS installed on your computer
- A Google Cloud Platform account to set up the Google API.
- Visual Studio Code or another code editor
What Problem Are We Trying to Solve?
In today’s world, users expect quick and secure ways to access applications without the hassle of creating and remembering new passwords. Traditional username-password systems can lead to frustration and pose security risks if not handled properly.
Google Authentication addresses these issues by providing:
- A Seamless User Experience: Users can log in with their existing Google accounts, eliminating the need to create a new one.
- Enhanced Security: Google’s robust authentication systems ensure secure access to your application.
By implementing Google Authentication, you improve both user experience and application security, making it an essential feature for modern platforms.
Step 1: Create a Google Cloud Project
- Go to the Google Cloud Console.
- Create a new project by clicking on the Create Project button.
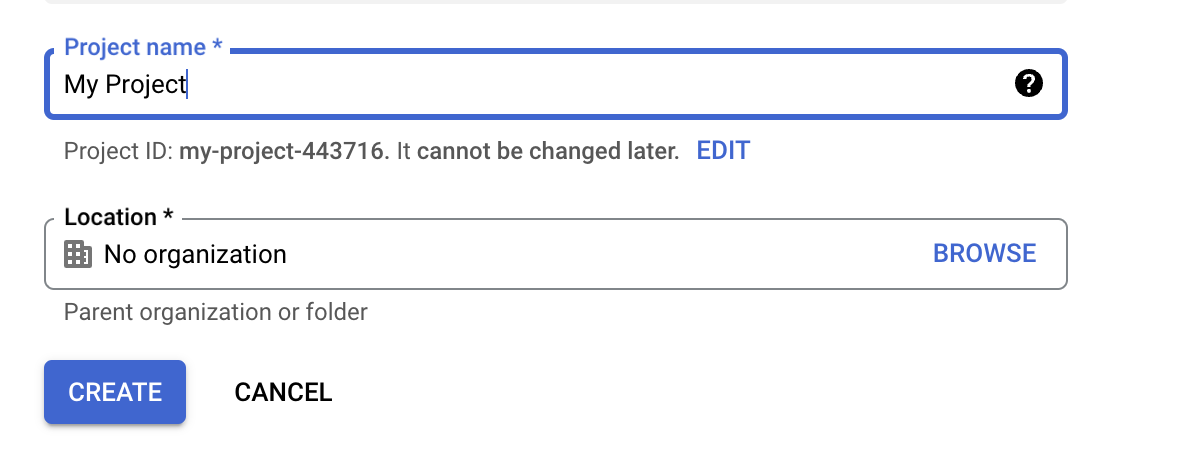
- After creating the project, you will be redirected to the project dashboard. Select the newly created project, and your dashboard should look like this.

- After the project is created, Click Create Credentials and select OAuth Client ID to create a client ID.
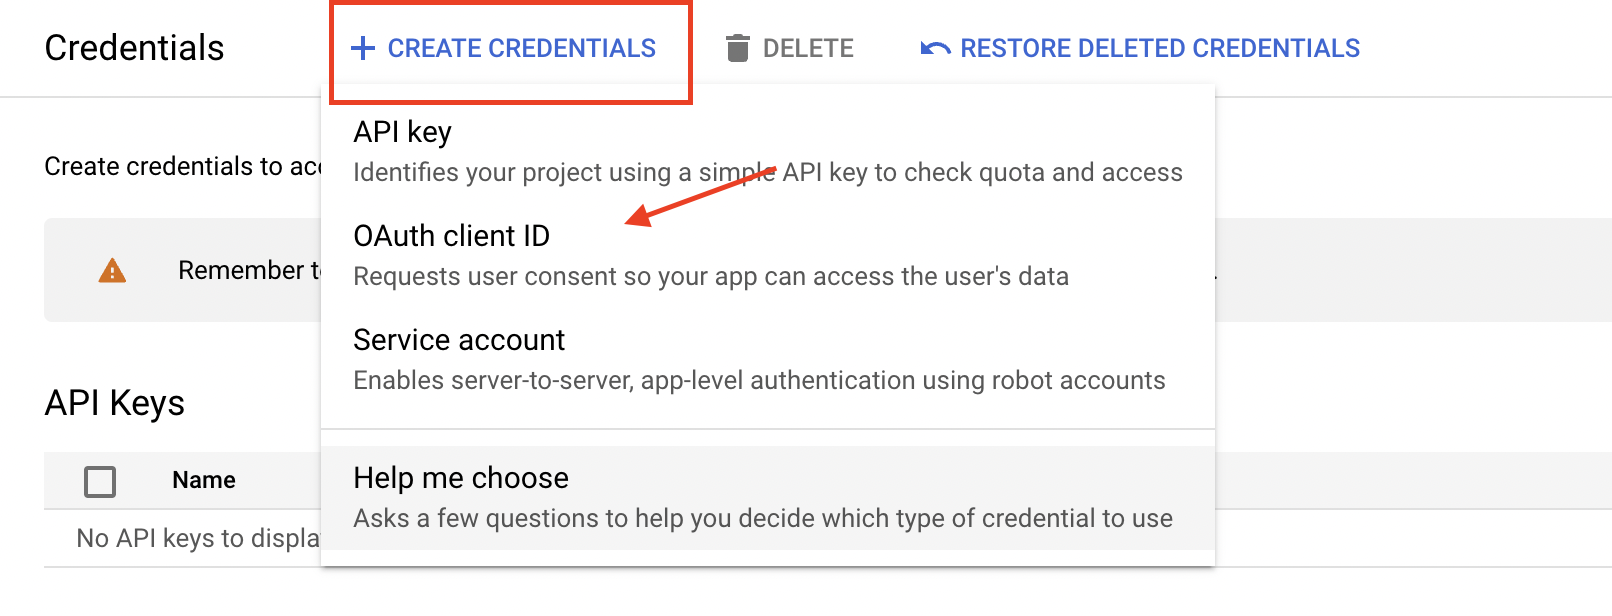
Now to create the client ID, we need to configure the OAuth consent screen.
What is an OAuth consent screen?
The OAuth consent screen is a page that appears when a user signs in to your application. It asks the user to grant access to your application and the resources it needs to function.
Step 2: Configure the OAuth consent screen
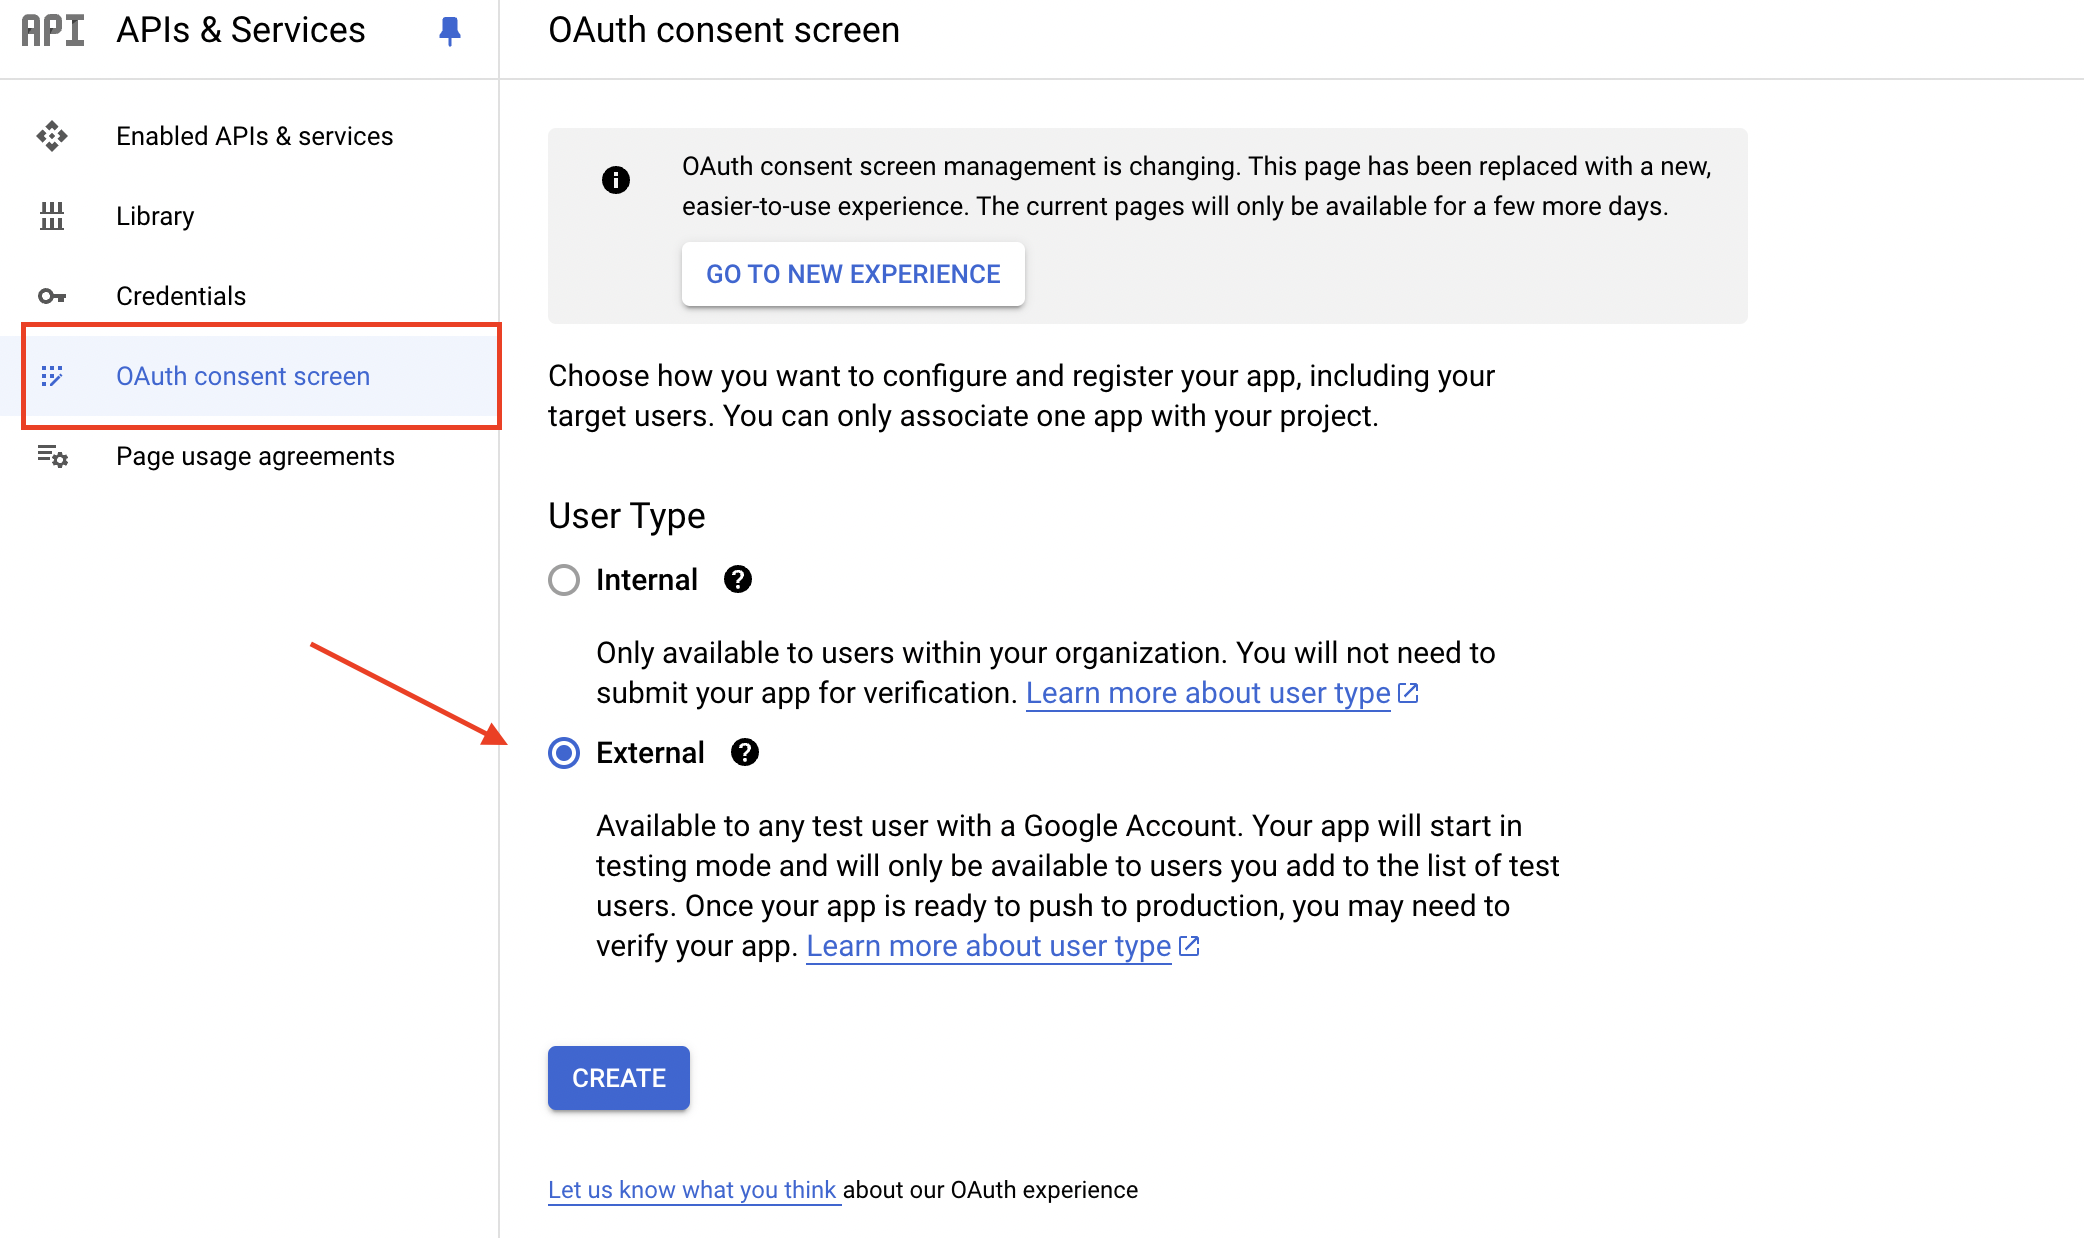
- To configure the OAuth consent screen , navigate to the OAuth consent screen on the side navigation bar. You'll be presented with an option, select external __ unless you are part of a Google-verified organization or application.
After that, click the Create button to create a consent screen.
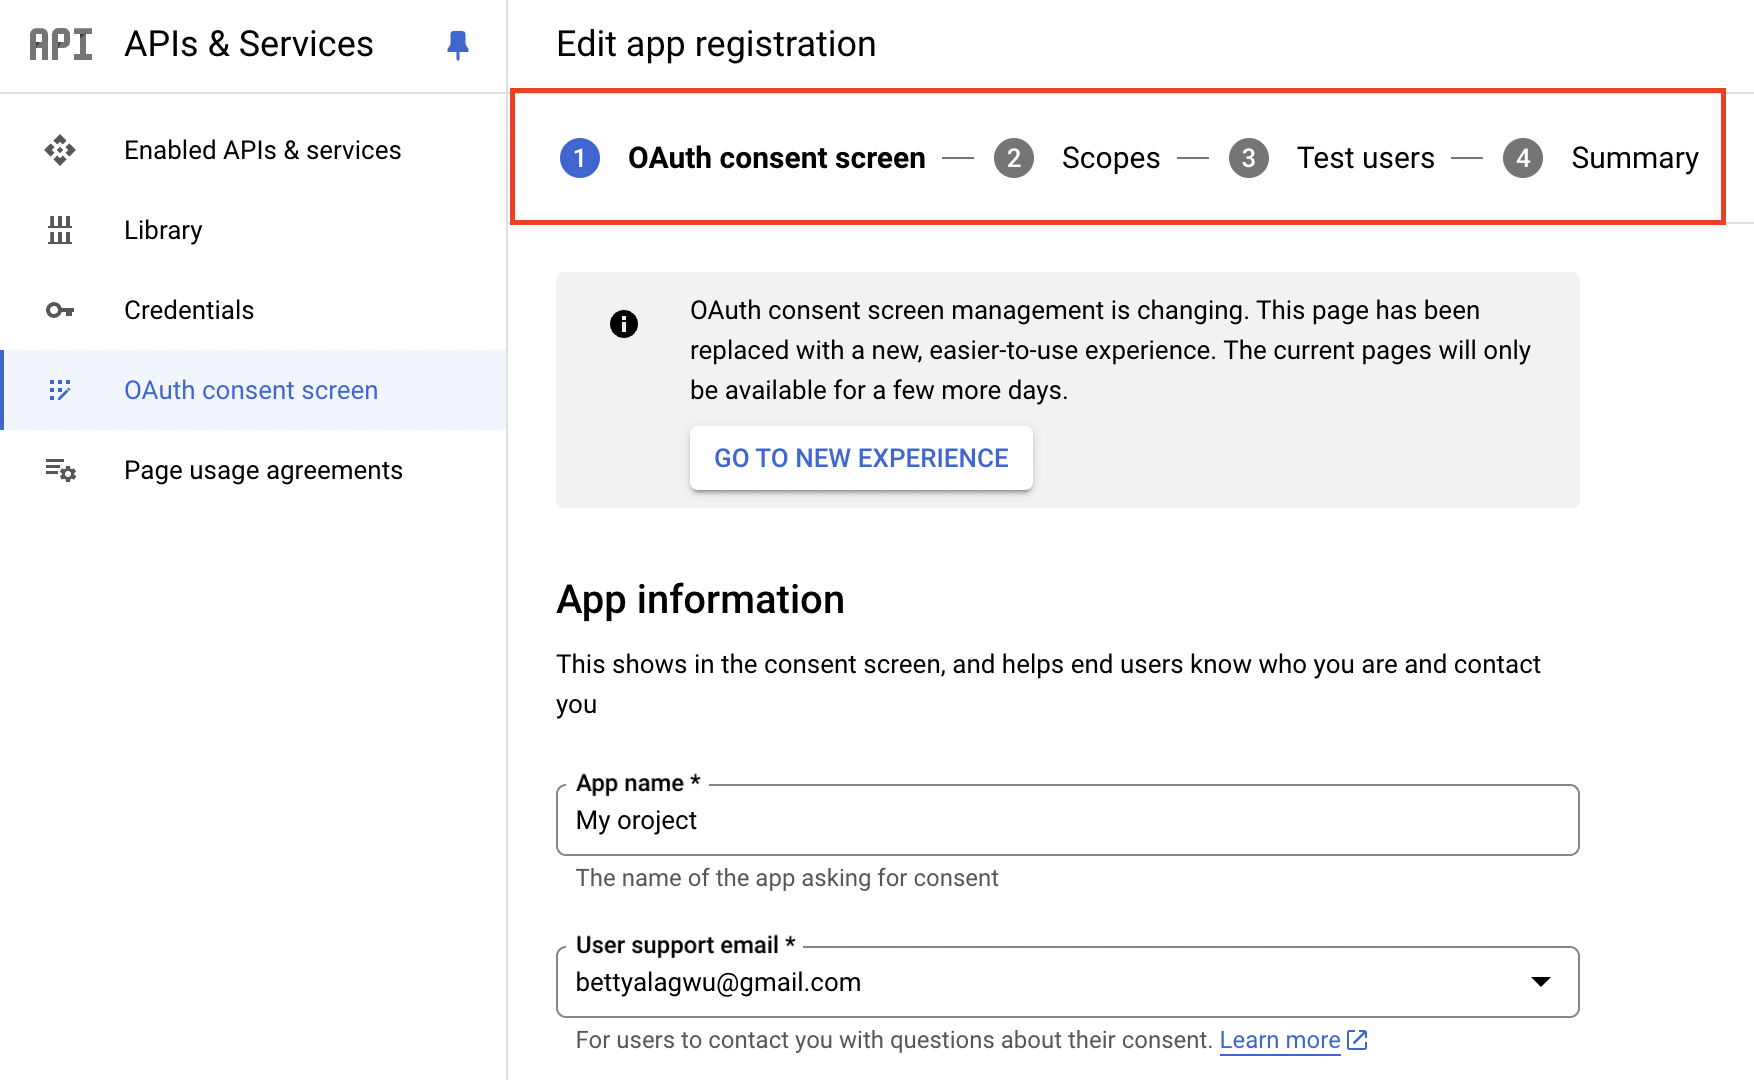
- Next, to complete the configuration, there are series of steps to configure the consent screen.
-
Now that our consent screen is configured, we need to create a client ID. Navigate back to the Credentials section and click on the OAuth client ID button.
-
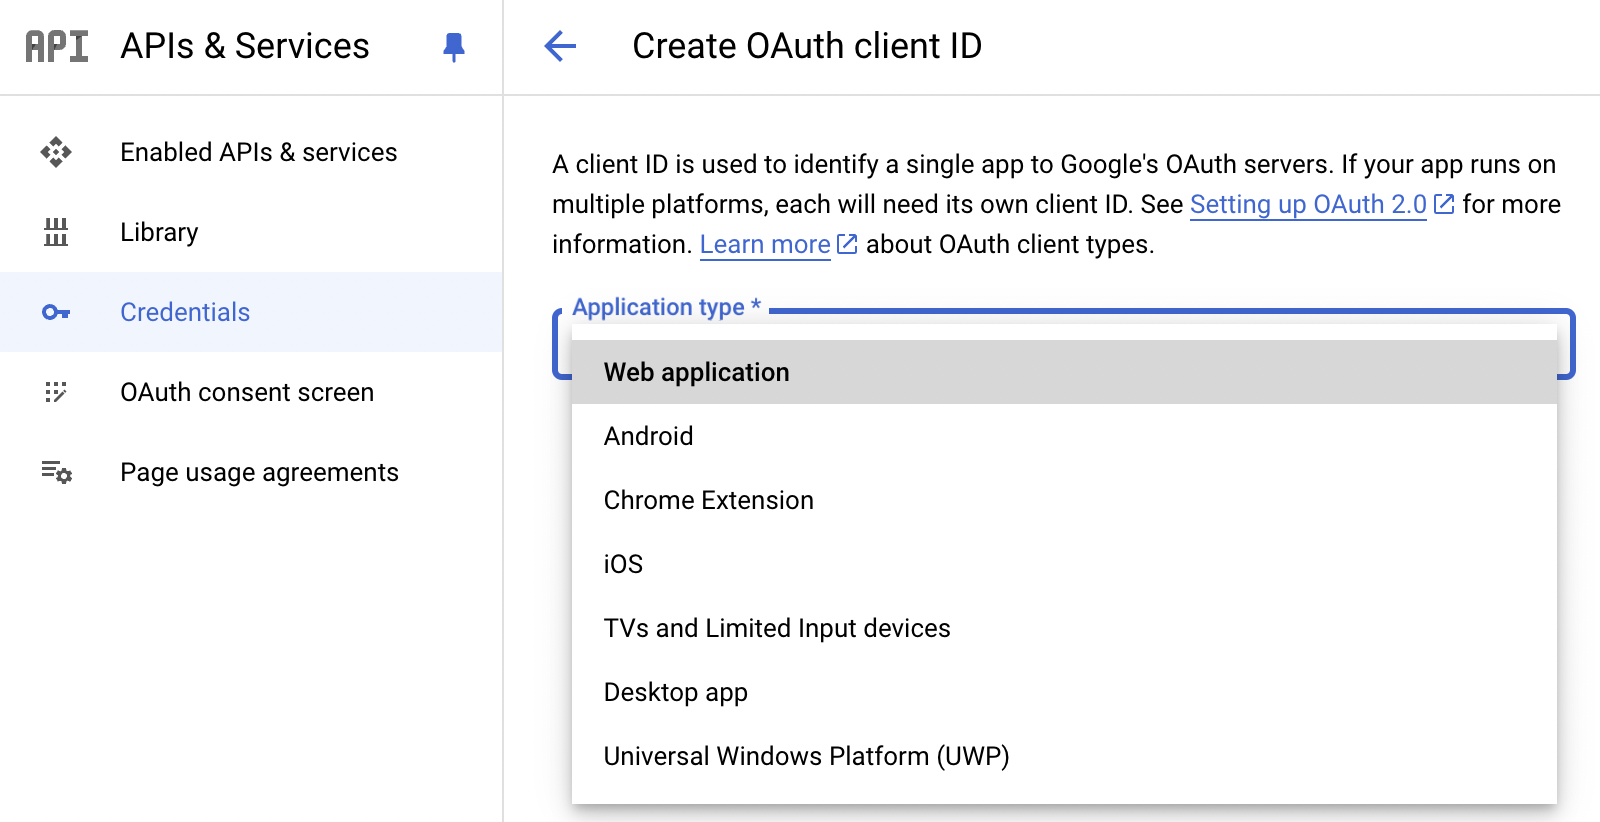
You’ll need to choose an application type, as shown below. For a React app, select Web application since we’ll be using the Google Client ID specifically for web-based applications.
-
After that, we'll be adding the two types of URLs that will be used to redirect users to the application after they sign in. Authorized JavaScript Origins and Authorized redirect URLs.
The Authorized JavaScript Origins specifies the URLs where your application is allowed to send requests from the user's browser.
The Authorized redirect URIs defines the URLs where Google can redirect users after they authenticate.
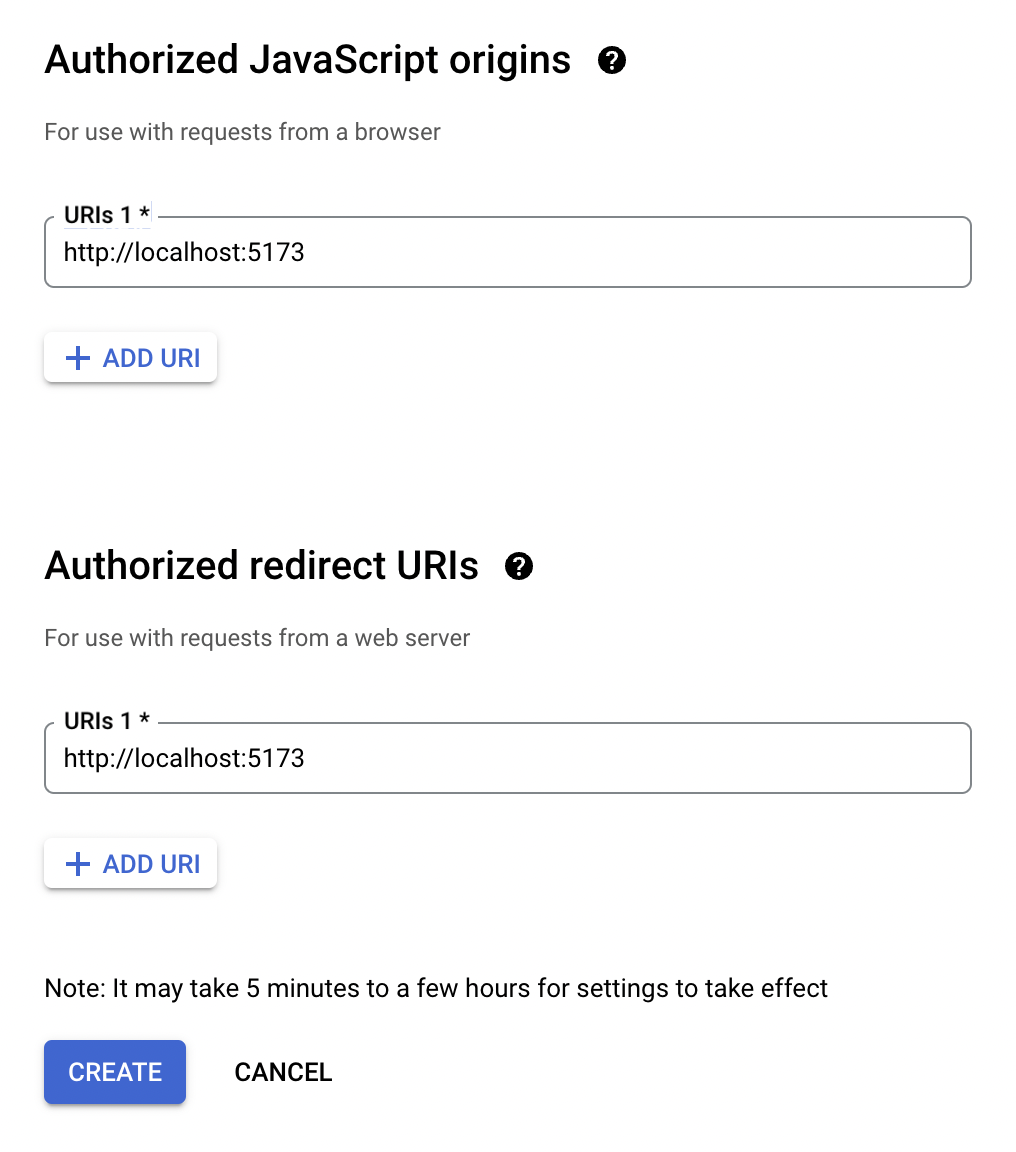
- After adding the URLs, click create to create a client ID.
- Finally, click the create button to generate your web client ID. You’ll be redirected to the homepage, where the newly created credentials will be displayed. Copy the generated Client ID, as we'll need it later.

With our web client ID successfully created, let's move on to our React app, install the necessary packages, and integrate Google login.
Step 3: Set Up Your React Project
- Create a new React app:
npx create-react-app my-project --template typescript
cd my-project
- Install the required package for Google Authentication:
npm install @react-oauth/google
Step 4: Implement Google Authentication
We’ll integrate Google Authentication into our React app and wrap the entire application with the GoogleAuthProvider. This ensures that the Google Auth Provider is accessible throughout the app.
// main.jsx

import { StrictMode } from 'react'
import { createRoot } from 'react-dom/client'
import { GoogleOAuthProvider } from '@react-oauth/google';
import App from './App.jsx'

createRoot(document.getElementById('root')).render(
  <StrictMode>
    <GoogleOAuthProvider clientId={GOOGLE_CLIENT_ID}>
      <App />
    </GoogleOAuthProvider>
  </StrictMode>,
)
Step 5: Implement Google Sign-In
Now that we have the Google Auth Provider set up, let's implement the sign-in functionality. We'll use the GoogleLogin provided by the @react-oauth/google package.
// SignIn.jsx

import { useNavigate } from 'react-router-dom';
import { GoogleLogin } from '@react-oauth/google';
import { jwtDecode } from "jwt-decode";

export default function SignIn({ setUser }) {
 const navigate = useNavigate();

 const handleSuccess = (credentialResponse) => {
    const decodedResponse = jwtDecode(credentialResponse.credential);
   setUser(decodedResponse);
   navigate('/home');
 };

  return (
    <div className="shadow-2xl">
        <GoogleLogin
          onSuccess={handleSuccess}
          onError={() => {
           console.log('Login Failed');
         }}
       />
    </div>
  );
 }

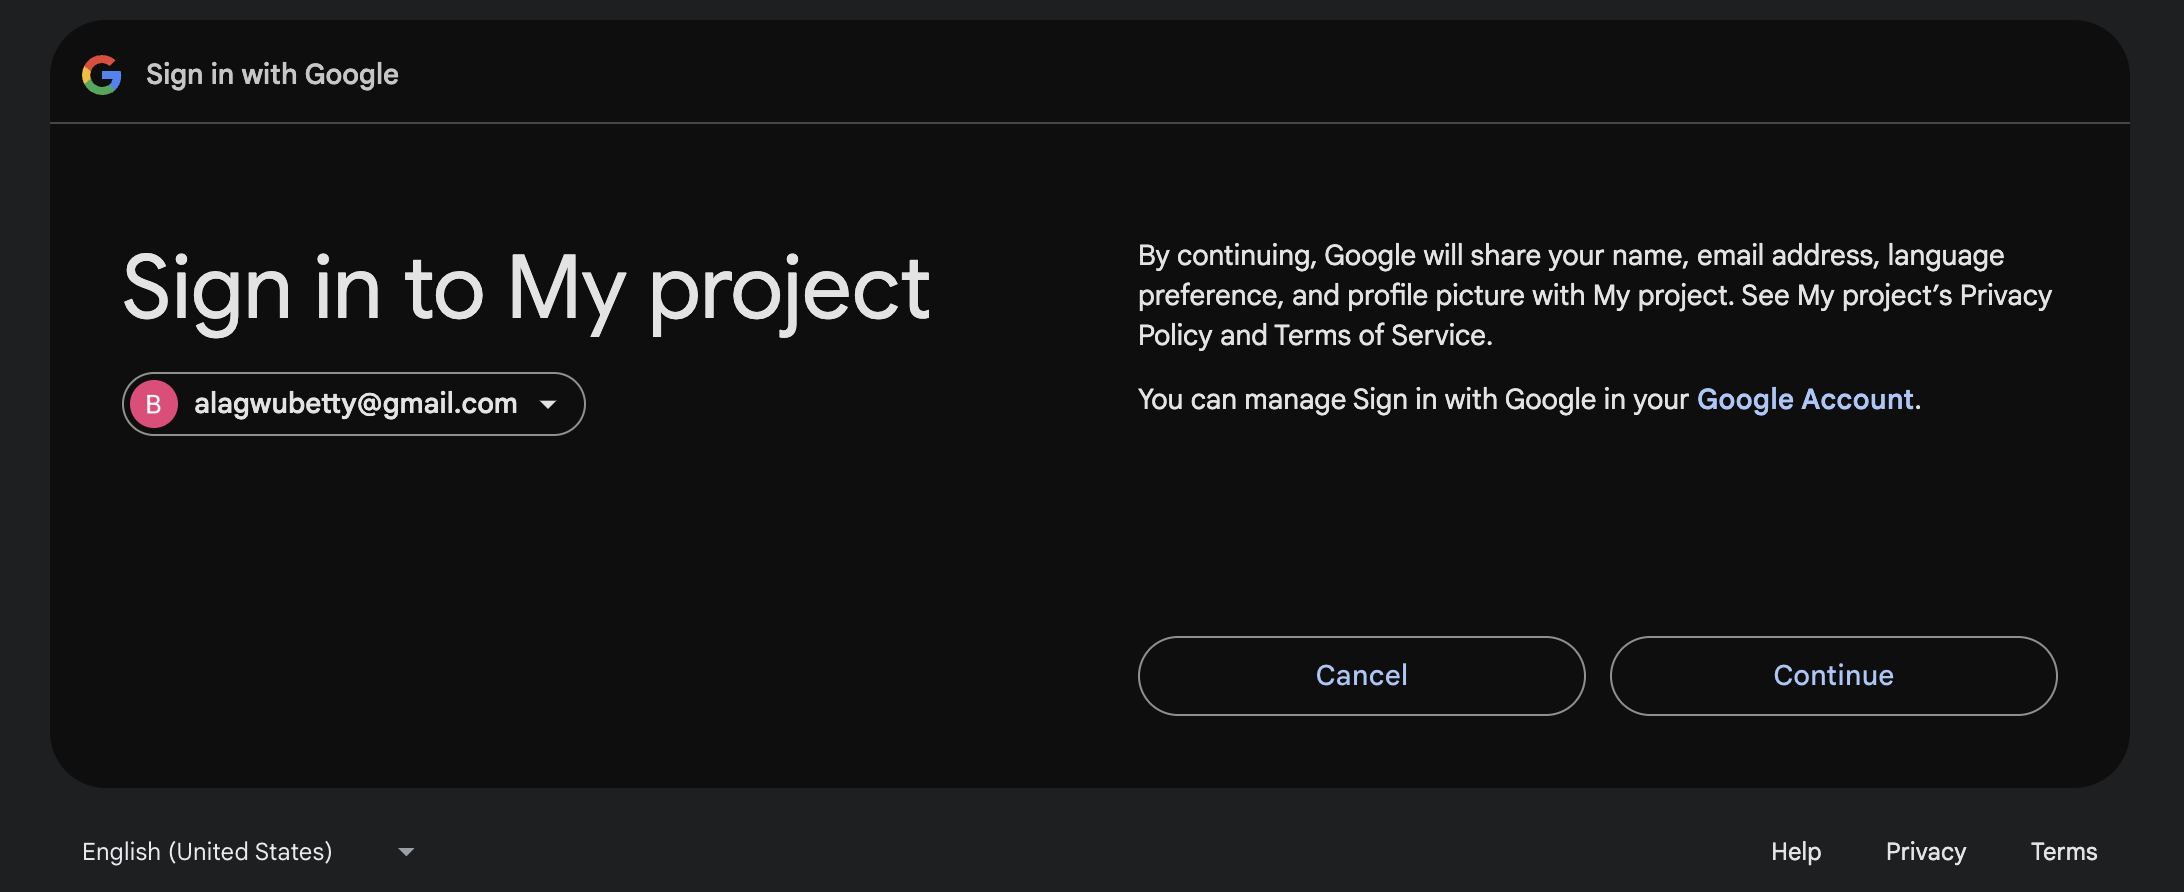
The code above demonstrates a straightforward approach to implementing Google login. We imported the GoogleLogin component from @react-oauth/google and also used jwtDecode from jwt-decode to decode the encrypted credentials GoogleLogin provides.
Additionally, we defined a handleSuccess function that decodes the encrypted credentials, sets the user, and navigates them to the home page when the login is successful. On login failure, we simply log an error message to the console.
Step 6: Implement Google Log-Out
import { useNavigate } from 'react-router-dom';

export default function Home({ user, setUser }) {
 const navigate = useNavigate();

 const handleLogout = () => {
   setUser(null);
   navigate('/sign-in');
 };

 return (
   <div className="p-4">
     <div className="flex justify-between items-center mb-4 space-x-4">
       <h1 className="text-2xl">Welcome, {user.name}!</h1>
       <button
         onClick={handleLogout}
         className="bg-red-500 hover:bg-red-700 text-white font-bold py-2 px-4 rounded"
       >
         Logout
       </button>
     </div>
     {/* Add your home page content here */}
   </div>
 );
}

// App.jxs

import { BrowserRouter, Routes, Route, Navigate } from 'react-router-dom';
import { useState } from 'react';
import Login from './components/login';
import Home from './components/home';


function App() {
  const [user, setUser] = useState(null);

  return (
    <div className='flex justify-start items-center flex-col h-screen'>
      <BrowserRouter>
        <Routes>
          <Route
            path="/"
            element={user ? <Navigate to="/home" /> : <Login setUser={setUser} />}
          />
          <Route
            path="/home"
            element={user ? <Home user={user} setUser={setUser} /> : <Navigate to="/" />}
          />
        </Routes>
      </BrowserRouter>
    </div>
  );
}

export default App
The above code shows the implementation of the Google log-out functionality. When the user clicks the "Logout" button, the handleLogout function is called, which sets the user state to null and navigates the user to the sign-in page.
On the App.jsx, we check if the user is authenticated by checking the presence of the user state. If the user is authenticated, we render the home page, otherwise, we redirect the user to the sign-in page.
Conclusion
Implementing Google Authentication in your React application not only enhances user experience but also simplifies the login process, making it more secure and user-friendly. In this tutorial, we’ve covered the entire setup process—from creating credentials in the Google Cloud Console to integrating the login and logout functionality in your app using React
With this foundation, you can now customize the authentication flow further, such as managing user sessions, handling tokens, or integrating additional Google APIs to enrich your application.
Remember, Google Authentication is a powerful tool for ensuring secure user sign-ins, making your application more secure and user-friendly.
If you have any questions or need further assistance, don't hesitate to reach out to me.
You can find the source code for this article here
Happy coding! 🎉
